
Creamy Homemade Mac and Cheese with Crunchy Topping
Nothing warms the heart and soul quite like a bowl of creamy homemade mac and cheese. With its rich, velvety cheese sauce enveloping perfectly cooked pasta, this comfort food classic takes a delightful twist with a crunchy topping that adds texture and flavor. Whether you’re enjoying it as a family meal, a side dish at a gathering, or a midnight snack, this creamy mac and cheese is sure to impress.
Key Takeaways:
- Preparation time: 30 minutes
- Difficulty level: Easy
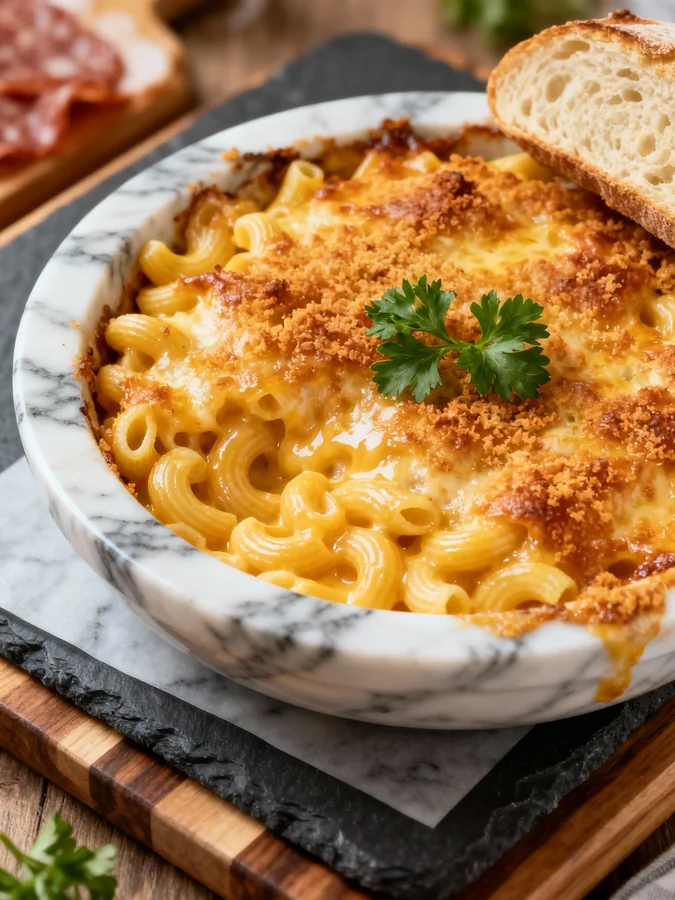
- Main ingredients: Elbow macaroni, cheese (cheddar and Gruyère), milk, butter, flour, breadcrumbs, and spices
- Special techniques: Making a roux for the cheese sauce and baking for the crunchy topping
- Storage information: Can be stored in the refrigerator for up to 3 days or frozen for up to 2 months
Introduction to Creamy Homemade Mac and Cheese with Crunchy Topping:
Mac and cheese is a dish that evokes nostalgia for many, rooted deeply in American culinary history. Its origins can be traced back to the 18th century, with the earliest known recipe appearing in a book called “The Experienced English Housekeeper.” However, it was in the United States that this dish truly flourished, evolving into the creamy, cheesy delight we know and love today. Over the years, mac and cheese has become a staple in households across the nation, celebrated for its comforting qualities and versatility.
The significance of mac and cheese extends beyond mere flavor; it represents comfort, community, and a sense of home. For many, it’s a dish that brings families together around the dinner table, whether it’s a simple weeknight dinner or a festive holiday gathering. Adding a crunchy topping elevates this beloved classic, offering a delightful contrast to the creamy pasta beneath and making it even more enjoyable.
Ingredients for Creamy Homemade Mac and Cheese with Crunchy Topping:
- Elbow macaroni (8 oz): The classic pasta shape that holds onto the cheese sauce perfectly.
- Cheddar cheese (2 cups, shredded): Provides a sharp, tangy flavor that is fundamental to this dish.
- Gruyère cheese (1 cup, shredded): Adds a nutty and creamy richness that complements the cheddar.
- Milk (2 cups): The base of the cheese sauce, creating a creamy texture.
- Butter (4 tablespoons): Used for the roux and adds richness to the sauce.
- All-purpose flour (¼ cup): Used to thicken the cheese sauce and create a smooth texture.
- Breadcrumbs (1 cup): For the crunchy topping that adds delightful texture.
- Paprika (1 teaspoon): Enhances the flavor and adds a touch of warmth.
- Salt (1 teaspoon): Enhances all the flavors in the dish.
- Black pepper (½ teaspoon): Adds a hint of spice.
Preparation Steps for Creamy Homemade Mac and Cheese with Crunchy Topping:
1. Cook the Pasta: Begin by bringing a large pot of salted water to a boil. Add the elbow macaroni and cook according to the package instructions until al dente. Drain the pasta and set it aside.
2. Make the Cheese Sauce: In a medium saucepan over medium heat, melt the butter. Once melted, whisk in the flour and cook for about 2 minutes to create a roux, stirring constantly. Gradually add the milk while whisking to prevent lumps. Continue to cook until the mixture thickens, about 5-7 minutes.
3. Add Cheese: Reduce the heat to low and add the shredded cheddar and Gruyère cheese to the sauce. Stir until the cheese is completely melted and the sauce is smooth. Season with paprika, salt, and black pepper to taste.
4. Combine Pasta and Sauce: Add the cooked macaroni to the cheese sauce, stirring to coat the pasta evenly.
5. Prepare the Crunchy Topping: In a small bowl, combine the breadcrumbs with a tablespoon of melted butter and a pinch of salt. Mix well until the breadcrumbs are evenly coated.
6. Assemble and Bake: Preheat your oven to 350°F (175°C). Pour the mac and cheese mixture into a greased baking dish. Sprinkle the breadcrumb mixture evenly over the top.
7. Bake: Place the dish in the preheated oven and bake for 20-25 minutes, or until the top is golden brown and crispy.
8. Serve: Remove from the oven and let it cool for a few minutes before serving. Enjoy your delicious creamy homemade mac and cheese!
Flavor Profile of Creamy Homemade Mac and Cheese with Crunchy Topping:
Creamy homemade mac and cheese is a symphony of flavors and textures. The first bite reveals a luscious, velvety cheese sauce that envelops each piece of pasta, exuding rich notes of cheddar and Gruyère. The sauce is creamy and slightly tangy, with a hint of nuttiness from the Gruyère that adds depth to the flavor profile.
The crunchy topping introduces a delightful contrast to the soft pasta and creamy sauce. Each crispy bite of breadcrumbs is seasoned to perfection, providing a satisfying crunch that enhances the overall experience. The aroma wafting from the oven as it bakes is intoxicating, filling your kitchen with a warm, cheesy scent that beckons everyone to the table.
Benefits of Creamy Homemade Mac and Cheese with Crunchy Topping:
While creamy mac and cheese is often viewed as a guilty pleasure, it does offer some nutritional benefits. The incorporation of cheese provides a good source of calcium and protein, which are essential for bone health and muscle repair. Additionally, the use of whole grain pasta can increase fiber content, aiding in digestion and promoting a feeling of fullness.
By making this dish at home, you have the advantage of controlling the ingredients, allowing you to choose high-quality cheeses and add in your favorite vegetables, like spinach or broccoli, for extra nutrients. Moreover, it’s a versatile recipe, enabling you to customize it to suit dietary preferences and restrictions, making it a wholesome option for family meals.
Serving Suggestions for Creamy Homemade Mac and Cheese with Crunchy Topping:
Creamy homemade mac and cheese with a crunchy topping is delicious on its own, but it can also be paired with a variety of side dishes to create a well-rounded meal. Consider serving it alongside a fresh green salad tossed with a light vinaigrette to balance the richness of the pasta. Grilled vegetables or steamed broccoli can also make for a colorful and nutritious addition to your plate.
For a heartier option, try serving mac and cheese as a side dish with roasted chicken or barbecue ribs. This dish pairs wonderfully with a crisp white wine or a refreshing iced tea, making it perfect for summer gatherings or casual family dinners.
Storage Tips for Creamy Homemade Mac and Cheese with Crunchy Topping:
To store your creamy homemade mac and cheese with a crunchy topping, allow it to cool completely at room temperature. Transfer the leftovers to an airtight container and refrigerate for up to 3 days. When reheating, you can add a splash of milk to restore creaminess and re-crisp the topping in the oven for a few minutes.
If you want to store it for a longer period, you can freeze the mac and cheese before baking. Cover the assembled dish tightly with plastic wrap and aluminum foil, and it can be frozen for up to 2 months. When you’re ready to enjoy it, thaw it in the refrigerator overnight and bake as directed, adding extra time if necessary.
Conclusion:
Creamy homemade mac and cheese with a crunchy topping is a timeless dish that brings comfort and joy to any meal. With its rich flavors and satisfying textures, it’s a recipe worth trying in your kitchen. Whether you’re enjoying it as a simple weeknight dinner or serving it at a gathering, this mac and cheese is sure to become a favorite. So gather your ingredients, follow the steps, and indulge in this deliciously creamy delight!
FAQ Section:
1. Can I use different types of cheese?
Yes! You can experiment with various cheeses such as mozzarella, Monterey Jack, or even blue cheese for a unique flavor.
2. Can I make mac and cheese ahead of time?
Absolutely! You can prepare it in advance and refrigerate it until you’re ready to bake.
3. How can I make my mac and cheese spicier?
Add a pinch of cayenne pepper or mix in some diced jalapeños to the cheese sauce for an extra kick.
4. Is it possible to make a gluten-free version?
Yes! Substitute regular pasta with gluten-free pasta and use a gluten-free flour blend for the roux.
5. Can I add vegetables to the mac and cheese?
Definitely! Broccoli, spinach, or peas can be added to enhance the nutritional value and flavor.
6. What can I use instead of breadcrumbs for a topping?
You can use crushed crackers, panko, or even crushed potato chips for a different texture.
7. How long does homemade mac and cheese last in the fridge?
It can be kept in the refrigerator for up to 3 days.
8. Can I bake mac and cheese without the crunchy topping?
Yes, you can skip the topping if you prefer a creamier texture throughout.
Creamy Homemade Mac and Cheese with Crunchy Topping
Prep Time: 15 minutes
Cook Time: 30 minutes
Servings: 4
Course: Main Course
Ingredients
- 8 ounces elbow macaroni
- 1 tablespoon salt
- 2 tablespoons unsalted butter
- 2 tablespoons all-purpose flour
- 2 cups whole milk
- 1 teaspoon Dijon mustard
- 1/2 teaspoon garlic powder
- 1/2 teaspoon onion powder
- 1/4 teaspoon cayenne pepper
- Salt and pepper to taste
- 2 cups shredded sharp cheddar cheese
- 1 cup shredded Gruyère cheese
- 1 cup panko breadcrumbs
- 2 tablespoons melted butter
- 1/4 cup grated Parmesan cheese
- 1 teaspoon dried parsley
Instructions
- Step 1: Cook the elbow macaroni in salted boiling water until al dente, then drain.
- Step 2: In a saucepan, melt butter, whisk in flour to make a roux, then gradually add milk and cook until thickened. Stir in seasonings and cheeses until melted.
- Step 3: Combine cooked macaroni with cheese sauce until well coated.
- Step 4: Mix panko breadcrumbs, melted butter, Parmesan, and parsley in a bowl.
- Step 5: Preheat oven to 350°F (175°C), pour macaroni and cheese into a greased baking dish, and top with breadcrumb mixture.
- Step 6: Bake for 20-25 minutes until golden brown and bubbly.
- Step 7: Let sit for 5 minutes before serving.